How to Add a Contact Form to a Static Site
Static sites are fantastic—they’re fast, secure, and cheap to host. But there’s a fundamental challenge: static sites don’t have backend processing capabilities. They’re just HTML, CSS, and JavaScript files served directly to users. There’s no server-side code running to handle data, process requests, or store information in a database.
This becomes especially apparent when you try to add a contact form. Forms can be built easily with HTML, but you need a backend to actually receive and process the submitted data. Without a backend, clicking “Submit” does… nothing.
So how do you solve this? Let’s explore your options.
The Static Site Dilemma
When you build a static site with generators like Astro, Hugo, Jekyll, or Next.js (in static mode), you’re creating a site that consists entirely of pre-built files. This architecture gives you:
- Blazing fast performance - No database queries or server processing
- Enhanced security - No backend means no backend vulnerabilities
- Simple hosting - Deploy anywhere that serves static files
- Lower costs - No need for expensive server infrastructure
But the flip side is that you can’t:
- Process form submissions
- Store data in a database
- Send emails directly from your site
- Execute server-side logic
Your contact form needs somewhere to send its data, and that requires a backend service.
Solution Options for Static Site Forms
1. Code and Deploy Your Own Backend on a VPS
You could build a complete backend application and deploy it on a Virtual Private Server (VPS). This gives you absolute control over everything but requires:
- Setting up and maintaining a server (DigitalOcean, Linode, AWS EC2, etc.)
- Writing backend code (Node.js, Python, PHP, etc.)
- Managing databases
- Implementing spam protection and security
- Setting up email delivery
- Handling server updates and monitoring
- Managing SSL certificates and domains
This approach makes sense if you need highly custom functionality or want complete ownership, but it’s overkill for most simple contact forms.
2. Serverless Functions
A more modern approach is using serverless functions (AWS Lambda, Cloudflare Workers, Vercel Functions) to handle form submissions. This eliminates server maintenance but still requires:
- Writing and maintaining backend code
- Managing API endpoints
- Implementing spam protection
- Setting up email delivery (via SendGrid, Mailgun, etc.)
- Handling errors and edge cases
This works well for custom requirements with less infrastructure overhead, but still adds development complexity.
3. Third-Party Form Builders
Services like Typeform or Google Forms provide complete, all-in-one form solutions. However, they come with limitations:
- Limited design customization
- Your users often leave your site to fill out the form
- Less control over the user experience
- Often more expensive
- Branding that’s not yours
- Can’t integrate seamlessly into your existing design
These are best for quick surveys, polls, or when you need advanced features like conditional logic and don’t care about design flexibility.
4. Third-Party Form Backend SaaS
This is what FiraForm is — when you already have the form design and just need the backend processing. Form backend SaaS services are designed specifically for developers, web designers, and static site generator (SSG) builders.
You build and control your form’s HTML and design completely, then point it to a backend endpoint that handles all the processing—spam filtering, email notifications, data storage, and more.
This is the recommended approach for most static sites because:
- No backend infrastructure to maintain
- Complete control over form design and HTML
- Built-in spam protection
- Email notifications out of the box
- Form data storage and management
- Works with any static site or framework
- Keeps users on your site
- Much faster to implement than options 1 or 2
There are several form backend SaaS options available (FiraForm, Formspree, Basin, and others), each with different features and pricing. We’re being transparent here—FiraForm is our take on this approach, built for developers who want simplicity without sacrificing control.
Building a Contact Form for Your Static Site
Let’s walk through creating a functional contact form using a form backend service. We’ll use FiraForm as an example, but the principles apply to any similar service.
Step 1: Create Your HTML Form
If you want to skip writing HTML manually, you can use our free form builder to visually create your form and generate the code for you. It’s a quick way to prototype and get started.
But if you prefer writing code yourself, start with a simple, semantic HTML form:
<form id="contact-form" action="YOUR_FORM_ENDPOINT" method="POST">
  <div>
    <label for="name">Name</label>
    <input
      type="text"
      id="name"
      name="name"
      required
    />
  </div>

  <div>
    <label for="email">Email</label>
    <input
      type="email"
      id="email"
      name="email"
      required
    />
  </div>

  <div>
    <label for="message">Message</label>
    <textarea
      id="message"
      name="message"
      rows="5"
      required
    ></textarea>
  </div>

  <button type="submit">Send Message</button>
</form>
Step 2: Set Up Your Form Backend
- Sign up for a form backend service (like FiraForm)
- Create a new form in the dashboard
- Copy your form endpoint URL
- Replace
YOUR_FORM_ENDPOINTin the form’sactionattribute
Step 3: Configure Form Behavior
For a better user experience, handle the submission with JavaScript:
const form = document.getElementById('contact-form');

form.addEventListener('submit', async (e) => {
  e.preventDefault();

  const formData = new FormData(form);
  const button = form.querySelector('button[type="submit"]');

  // Update button state
  button.disabled = true;
  button.textContent = 'Sending...';

  try {
    const response = await fetch(form.action, {
      method: 'POST',
      body: formData,
      headers: {
        'Accept': 'application/json'
      }
    });

    if (response.ok) {
      // Show success message
      form.innerHTML = '<p class="success">Thank you! Your message has been sent.</p>';
    } else {
      throw new Error('Form submission failed');
    }
  } catch (error) {
    // Show error message
    alert('Something went wrong. Please try again.');
    button.disabled = false;
    button.textContent = 'Send Message';
  }
});
Step 4: Style Your Form
Add CSS to match your site’s design. Since you control the HTML completely, you can style it however you want:
form {
  max-width: 600px;
  margin: 0 auto;
}

form div {
  margin-bottom: 1.5rem;
}

label {
  display: block;
  margin-bottom: 0.5rem;
  font-weight: 600;
}

input,
textarea {
  width: 100%;
  padding: 0.75rem;
  border: 1px solid #ddd;
  border-radius: 4px;
  font-size: 1rem;
}

button {
  background: #007bff;
  color: white;
  padding: 0.75rem 2rem;
  border: none;
  border-radius: 4px;
  cursor: pointer;
  font-size: 1rem;
}

button:hover {
  background: #0056b3;
}

button:disabled {
  opacity: 0.6;
  cursor: not-allowed;
}
Managing Your Form Submissions with FiraForm
Once your form is set up with the FiraForm endpoint URL, you can start receiving data directly into your FiraForm backend panel. Every submission is captured, organized, and ready for you to review or export.
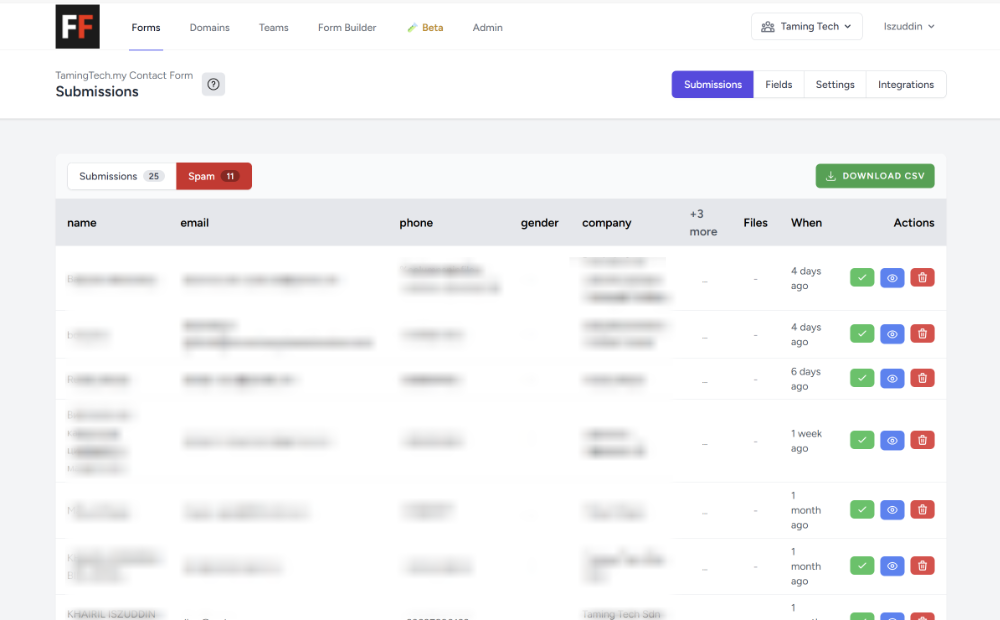
Export Your Data
All your form submissions can be downloaded in CSV format with a single click. The CSV file can be opened in Excel, Google Sheets, or any other spreadsheet software, making it easy to:
- Analyze submission trends
- Share data with your team
- Import into your CRM or other tools
- Create reports and charts
- Back up your data locally
This gives you complete ownership of your data and flexibility in how you use it.
AI-Powered Spam Filtering
FiraForm includes built-in spam filtering powered by AI. You don’t need to configure anything—it automatically detects and flags suspicious submissions, keeping your inbox clean and saving you time.
Dynamic Field Detection
Here’s something powerful: you don’t have to define any fields inside FiraForm. The system automatically learns your form fields based on the data being submitted.
When you first set up your form:
- Submit a test form with sample data
- FiraForm detects all the fields automatically
- They appear in your dashboard, ready to use
This means you can update your form’s HTML anytime, add or remove fields, and FiraForm adapts automatically.
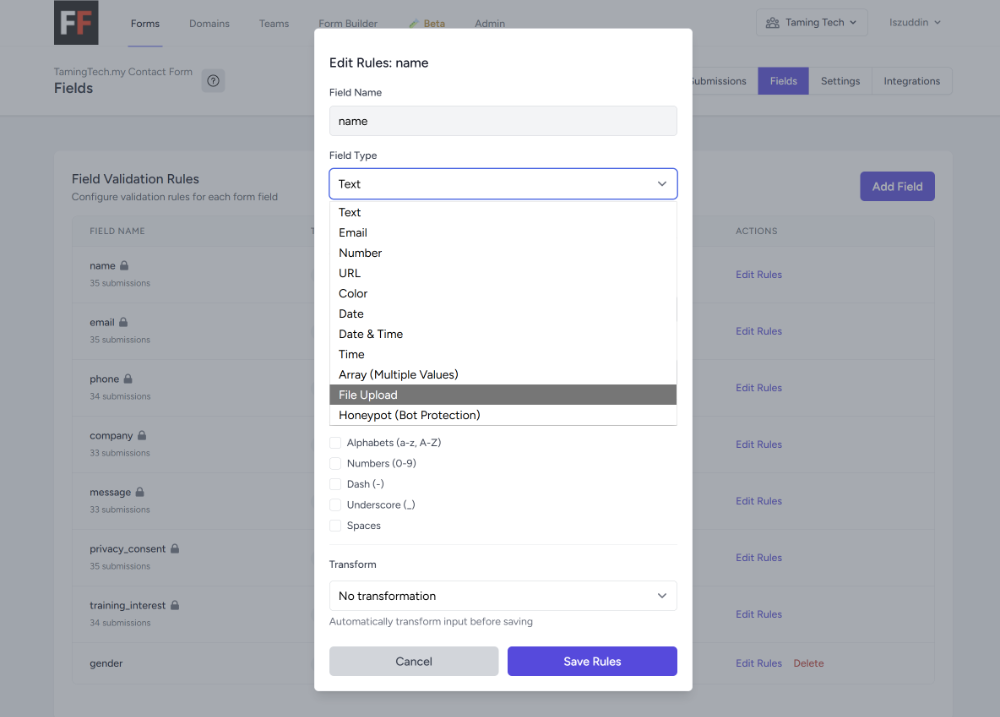
Field Validation Rules
Once FiraForm has detected your fields (from that initial test submission), you can define validation rules for each field:
- Required fields
- Email format validation
- Minimum/maximum length
- Custom regex patterns
- Number ranges
These server-side validation rules work alongside your HTML5 client-side validation for an extra layer of security.
Additional Security with Honeypot Fields
You can add honeypot fields to your form for extra spam protection. These are hidden fields that real users won’t see, but bots will fill out:
<input
  type="text"
  name="_gotcha"
  style="display:none"
  tabindex="-1"
  autocomplete="off"
/>
When a submission includes data in the honeypot field, FiraForm automatically marks it as spam.
Form Settings and Features
From the FiraForm settings panel, you can configure:
- Email Notifications: Get notified via email when someone submits your form. Customize the recipient, subject line, and email template.
- Custom Thank You Redirect URL: Redirect users to a custom thank you page after successful submission (available for paid plans).
- CAPTCHA Protection: Turn on CAPTCHA verification for additional bot protection on high-traffic forms.
- Auto-reply Emails: Automatically send a confirmation email to users who submit your form.
File Uploads
If your form includes file upload fields, make sure to add the enctype attribute to your form tag:
<form
  id="contact-form"
  action="YOUR_FORM_ENDPOINT"
  method="POST"
  enctype="multipart/form-data"
>
  <div>
    <label for="attachment">Attachment</label>
    <input
      type="file"
      id="attachment"
      name="attachment"
      accept=".pdf,.doc,.docx,.jpg,.png"
    />
  </div>
  <!-- other fields -->
</form>
The enctype="multipart/form-data" is required for file uploads to work properly.
Advanced Features
Webhooks
For advanced integrations, you can configure webhooks to send form data to other services automatically:
- Send to Slack when you receive a new submission
- Trigger Zapier workflows
- Push data to your CRM
- Integrate with custom applications
API Access
Access your form submissions programmatically through FiraForm’s API. This is useful for:
- Building custom dashboards
- Integrating with existing tools
- Automating workflows
- Exporting data to other systems
Why Use a Dedicated Form Backend?
You might wonder: why not just use serverless functions or build your own backend? Here’s why a dedicated form backend service makes sense:
Time Savings: Building a robust form handler takes time. You need to handle validation, spam protection, email delivery, error handling, rate limiting, and more. A form backend service does all this out of the box.
Maintenance: No code to maintain, no servers to monitor, no security updates to apply. The service handles everything.
Reliability: Form services are built specifically for this purpose. They have the infrastructure, monitoring, and expertise to ensure your forms work reliably.
Features: Get advanced features like file uploads, webhooks, integrations, and analytics without building them yourself.
Scalability: Whether you get 10 submissions per month or 10,000, the service scales automatically.
Conclusion
Adding a contact form to a static site doesn’t have to be complicated. While static sites lack backend processing capabilities, dedicated form backend services bridge this gap perfectly. They let you maintain the benefits of static hosting—speed, security, and simplicity—while giving your users a functional way to contact you.
The key is to:
- Build your form with clean, semantic HTML
- Point it to a reliable form backend service
- Enhance the experience with JavaScript
- Style it to match your site’s design
With this approach, you get the best of both worlds: the performance and simplicity of static sites, with the functionality of dynamic forms.
Ready to add a contact form to your static site? Get started with FiraForm and have your form working in minutes.